After making my forsythia wreath the other day, I wanted to make different wreath for our back door. This super simple wreath was also quick to make and just as inexpensive as the other.
To make this wreath I needed (again I’ve also included a 2012 retail cost break-down. I again used coupons, purchased stuff on sale, and used what I had on hand):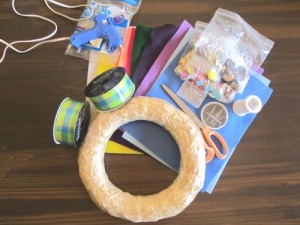
(please note that I have buttons, needle, and thread pictured above but changed my mind about using them)
- 1 straw wreath-($2.99-on sale for 50% off)
- 2 3-yard rolls of wire edge wide ribbon ($3.99 each-on sale for 50% off)
- 4 squares of felt-(4 for $1.00-I had yellow and green on hand but bought the 2 shades of purple)
- T-pins
- Glue gun
- Glue sticks
- Scissors
(Not pictured)
- Length of twine (on hand)
- Foamie letters (on hand-I spelled out ‘Welcome’ but you can select whatever word(s) you want
 Step 1: Secure one end of the ribbon with a T-pin to the wreath (I left the plastic wrap on the wreath because it isn’t going to show anyways). Wrap the ribbon tightly around the wreath.
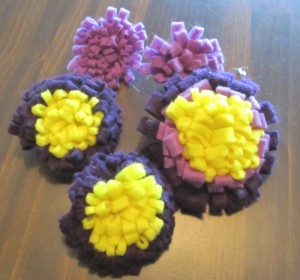 Step 2: Make the felt flowers. You can find instructions for those HERE at Mrs. Priss’ site. I absolutely love these flowers; so very cute. The big flower is made with long strips of yellow, light purple, and dark purple. The smaller 2 color ones are made with 1 long length of yellow and dark purple. The small light purples are made from one long length. Stick T-pins through the center of the flowers.
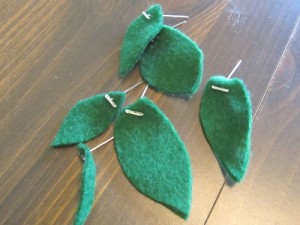
Step 3: Cut out a few leaves from the green felt. Stick T-pins through the ends of the leaves.
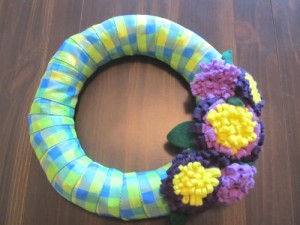 Step 4: Using the T-pins in your pieces, arrange the flowers and leaves on one side of the wreath. Using the pins instead of gluing to wreath made it much easier to arrange and re-arrange the flowers.
Step 5: (no image available) Cut a length of twine about twice the diameter of the wreath. Glue the top of your foamie letters fairly close together to the middle of the twine. Tie a little overhand knot on each end of your foamie word, then using a T-pin secure to your wreath where you want it. I placed mine so that I could pull the ribbon over the T-pin to hide. Trim the twine and tuck the extra under the ribbon.
 Step 6: Using the leftover ribbon, loop it through your wreath then tie a little bow at the top. I used one more T-pin to secure the ribbon to the back of the wreath so it wouldn’t shift with the opening and closing of the door.
And there you have it. So cute and super simple. Don’t you just love those felt flowers?


Your wreath is so darling!!
Thank you, Morgan. I love your felt flower tutorial and was very inspired. (edited post to include your blog name.)